
Sidebar
en:transformation:mappings:details
Table of Contents
Edit mappings
To get a detailed view of a mapping, simply double-click on the mapping to be edited in the Mappings-List, and the detailed view will open. In this view1) you can edit the mapping.

Context menus
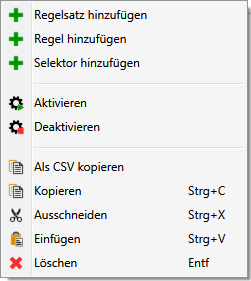
Depending on the mapping element, the context menu offers different options:
 on rule sets further rule sets or rules can be added. Rulesets can be disabled or enabled.:
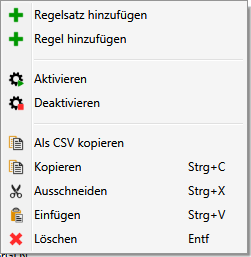
 On rules, additional rule sets, rules or selectors can be added. Rules can be deactivated or activated.:
 \
\  On selectors only additional selectors can be added. Selectors can not be deactivated or activated.:
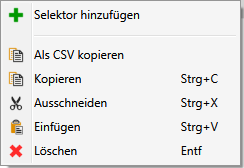
- Identifiers of source or target objects can be copied:

- Arrays of source or target objects can be expanded in the tab Object Instance or in the tab Query Result:
 \
\


Rule sets
Rule sets are a collection of mapping rules that are executed within the rule set as often as the XPath selection in the rule set can be applied to the source instance. The target of a rule set must always be a data element of type ArrayList. However, rule sets do not necessarily have to serve a target but are also used to harmonize the hierarchy of the data source with the hierarchy of the data target.
Rule sets can be recognized by the  symbol.
Edit rule set
Select the rule set to be edited with a left mouse click2). You can now edit, to the right of the icon, the name of the ruleset, the data source3) or the destination.
Rule sets and their properties can also be edited in the Extended Properties see: ruleset.
Add rule set
To add a new rule set, use the context menu, which is available by right clicking on an existing rule set4). Here you select Add rule set. A new ruleset is inserted under the current cursor position and named with the prefix rs_5).
Give the rule set a name6). Click on the first field to the right of the symbol and then press the Enter key
In the Source area, click on the field to the right of the name field and select a Source-Object, e.g. ORDHDR, to the left of the mapping table. Hold down the left mouse button and drag the ORDHDR object into the Selection field. After releasing the left mouse button, the corresponding value with the correct path specifications is entered in the source field of the rule record.
If there is a suitable data structure in the target object, proceed in the same way with the TARGET and drag the suitable structure into the TARGET7).

Add rule set via Drag&Drop
When creating new mappings, it is useful to map complete structures of the data source or data target in the mapping. This can be done quickly perDrag&Drop] method can be implemented. To do this, the required structure is simply stored in the mapping using Drag&Drop. See Demonstration:

Now the semi-finished rules can be quickly mapped to the data targets.
Rules
Mappingrules usually link a unique data element of the source object with a unique data element in the target object. The expression in the column Source8) determines which value is mapped to the target.
Rules are indicated by the symbol  .
.
Add a rule
To add a new rule, use the context menu, which is available by right-clicking in the middle area. Here you select Add rule.
A new rule is inserted under the current cursor position and named with the prefix r_9).
Right-click on the rule set and select Add rule from the context menu to add a rule to the rule set. Click to the right of the icon and give the rule a name that speaks for you.
Drag the DocumentNumber object into the Source field. Then expand the ORDER (in the target object), select the DocNumber field, and drag it into the Target field. Note that a description of the respective fields is displayed at the bottom right.
Add rule by Drag&Drop
Alternatively you can also use a Drag&Drop method to create new rules. You select the required data element in the source object and drag it to the corresponding data element in the target object using Drag&Drop. The rule is inserted as a new element within the currently selected rule set or under the currently selected rule.
See the following demonstration:

Finish your input by clicking on the button  , so that your changes are taken over into the eBiss database.
Edit rule
Select the rule to be edited with a left mouse click10). You can now edit the name of the rule, the data source11) or the target.
Rules and their properties can also be edited in the Extended Properties bearbeitet werden siehe: Regel
Selectors
Selectors offer the possibility of alternative selections. This is used in the following situations:
- A target element should alternatively be served with the first hit from different source elements12).
- A target element is to be composed of different source elements13).
The functionality of the selectors is set in the advanced properties, under the tab element properties, in the selection mode, the superordinate rule. The selection mode offers the following options:
Selectors are indicated by the symbol  .
.
Add selector
To add an alternative selector use the context menu, which is available by right clicking on a rule. Here you select Add Selector. A new selector is inserted under the current rule17).
Edit selector
To edit a selector, click on the corresponding line and change the data source18). in the Source.
column
Selectors and their properties can also be edited in the Extended Properties see: selector]
Copy & paste
All mapping elements can be copied 19) and pasted 20) via keyboard shortcut. However, the line(s) must be marked as a whole. Multiple selection is also possible.
Move
All mapping elements can be moved to a different location using Drag & Drop. If the Shift key is pressed while moving, the cursor changes and the element to be moved is inserted into the mapping above the selected element. A release above a rule will insert the element to be moved below the rule. If you drop the moved element above a rule set, it is inserted as the last “child” in the rule set.
Extended Properties
To be able to edit rules or rule sets better, you can also edit within the Extended Properties. Click on the symbol  to open the Element properties and then on the element you want to edit, you will get a detailed list with all properties.
 Note: In general the mappings can be extended at will. The selectors can be used to make additional selections and the XPath assignments can be used arbitrarily. Also direct assignments of values from the mappings into the fields of the target object are possible or the storage of variables which are used otherwise.
XPath query
The XPath query offers the possibility to query single XPath expressions and Functions directly to the source object instance. You can enter an XPath expression in the text field and query with  21). The result of the query is then displayed in the left pane in the Result query tab.
Note: When entering XPath selections, it must always start with a double forward slash.
Examples:
//Order/Items[1]
//SG_7[1]/SG_5[1]/PIA[@DE_4347='1' and DG_C212/@DE_7143 ='LN']/DG_C212/@DE_7140
Translate(//@value[1], '1;2;3;4', 'A;B;C;D')
Search in mapping
In extensive mappings it is sometimes difficult to find certain contents quickly. That's why eBiss 3 offers a search function.
The help can be started with the keyboard shortcut [Ctrl]+[f]. A small dialog window will then appear:

Here you can enter the search term and use the button 123 to count the occurrences of the search term. If there are hits, the buttons Next result and Previous result can be used to toggle through the hits. The system then jumps to the line in which the search term was found. We recommend that you expand all rule records first.
Note: The search is not case-sensitive.
Data element Properties
Data elements that are mandatory are marked in the object definition with a red *.
Further properties can be seen in the lower part of the object definition and display the properties of the data element selected by mouse click or cursor keys.
The Frame-Attribute specified in the object class are also displayed. Based on this information, the values to be expected in the message envelope22) can be recognized without any doubt and without detours.

1)
Per default you see the Tab Properties
2)
the line will then be highlighted in gray.
3)
, 11)
, 18)
Here you can enter XPath selections, mapping functions, constants or combinations of all.
4)
When creating a new mapping, a rule set is always created as root by default.
5)
rs = ruleset
6)
e.g. rs_Header.
7)
In the example shown, this is not necessary because the data target Or is already triggered in the root rule record.
8)
XPath selections, mapping functions, constants or combinations of all can be entered here.
9)
r = rule
10)
the line will be highlighted in gray.
12)
selection mode = FirstResult
13)
selection mode = Concatenate
14)
Combines all results to one string.
15)
default value
16)
deactivates all possibly existing selectors
17)
selectors have no names.
19)
CTRL+c or via context menu
20)
CTRL+v or via context menu
21)
The button Apply Query, to the right of the XPath query text field.
Apply Query, to the right of the XPath query text field.22)
Frame
en/transformation/mappings/details.txt · Last modified: 2024/02/20 08:15 by 127.0.0.1